24 Mar 2026
- 0 Comments
Roti Hydration Calculator
Proper hydration is key for perfectly round roti. This calculator helps you find the right water-to-flour ratio based on the article's science: 50% hydration (water weight = 50% of flour weight) creates dough with earlobe-like texture that rolls evenly without tearing.
The article explains: "The goal is a hydration level where the dough feels soft but not tacky." This ratio ensures gluten relaxes properly during resting and rolls smoothly into a perfect circle.
How to use:
1. Enter your flour amount in cups
2. Click Calculate
3. Your roti dough should feel like an earlobe - soft but not sticky
We have all been there. You spend twenty minutes kneading the dough, rolling out each piece with care, and cooking it on a hot pan. But when you lift it up, it is lopsided, uneven, or worse, it tears apart. Making a perfectly round roti feels like a secret skill reserved for grandmothers, but it is actually just physics and patience. The shape depends entirely on how you handle the dough before it even touches the rolling pin.
Many people blame the rolling pin or the heat, but the real culprit is usually the gluten development or the resting time. If you understand what happens inside the dough ball, you stop fighting the flour and start working with it. This guide breaks down the exact mechanics of creating uniform flatbreads without the frustration.
Quick Summary
- Use fine whole wheat flour (Atta) for better elasticity.
- Knead the dough until it feels like an earlobe, not stiff.
- Rest the dough for at least 30 minutes to relax gluten.
- Roll from the center outward without twisting the pin.
- Cook on medium-high heat to ensure even puffing.
The Science of the Dough
Before you even think about rolling, you need to understand the base. The foundation of any good flatbread is the flour. Not all whole wheat flour is the same. In India, you often find Whole Wheat Flour is a finely ground grain product that contains bran, germ, and endosperm. Atta is typically stone-ground, which retains more heat and creates a finer texture compared to standard roller-milled flour. This fine texture is crucial because coarse particles can tear the dough when you roll it thin.
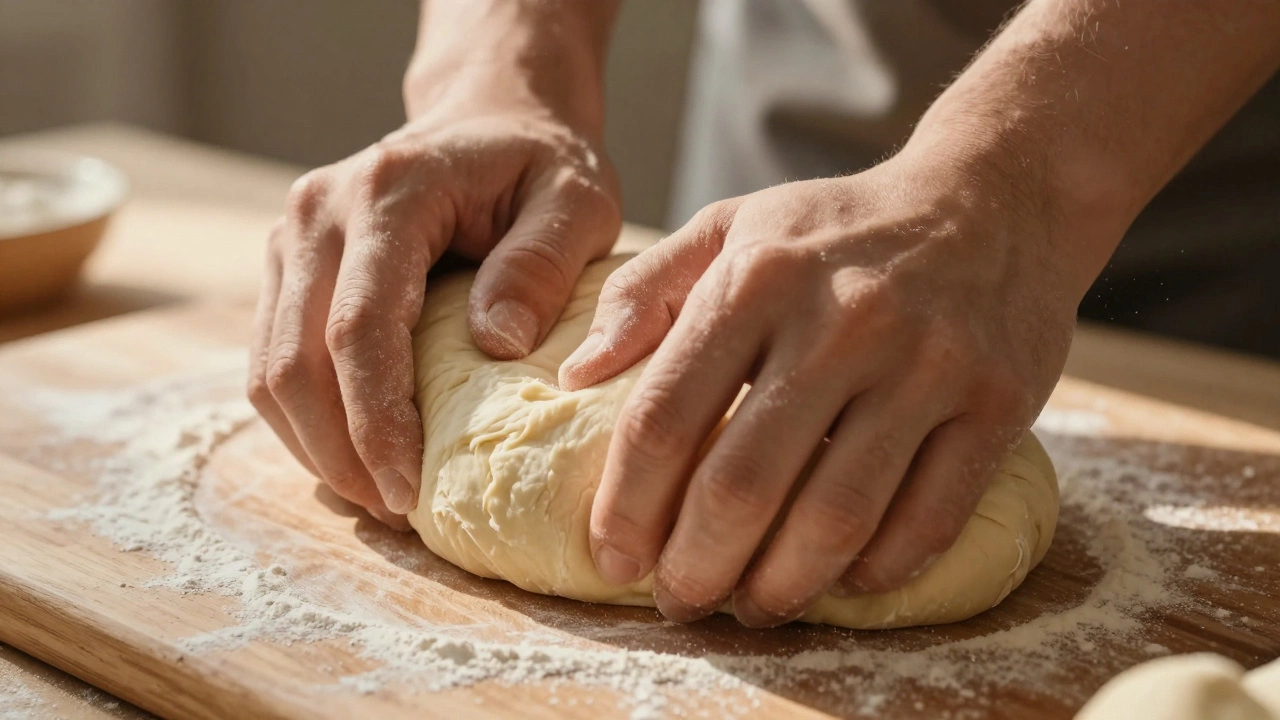
When you mix flour with water, proteins called glutenin and gliadin combine to form gluten. Gluten is the elastic network that holds the gas bubbles inside the bread. If you add too little water, the gluten strands remain tight and brittle. If you add too much, the dough becomes sticky and hard to handle. The goal is a hydration level where the dough feels soft but not tacky.
Think about the texture of your earlobe. That is the target consistency. If you press your finger into the dough, it should bounce back slowly. If it snaps back instantly, it is too tight. If it leaves a deep indent, it is too wet. This specific texture allows the dough to stretch without snapping when you apply pressure with the rolling pin.
Kneading Techniques for Uniformity
Kneading is not just about mixing ingredients; it is about aligning the gluten strands. When you knead, you are essentially folding the dough over itself repeatedly. This action organizes the protein network into sheets rather than random clumps. Organized sheets stretch evenly, which is why your rotis come out round instead of jagged.
Start by mixing the flour and salt in a large bowl. Make a well in the center and add warm water gradually. Do not dump all the water at once. Add about 70% of the required water first, then mix with your fingers. Once the crumbs form, add the remaining water slowly. This control prevents pockets of dry flour that cause weak spots in the final roti.
Use the heel of your hand to push the dough away from you, then fold it back over. Rotate the bowl slightly with your other hand. This ensures every part of the dough gets worked equally. Knead for at least 8 to 10 minutes. Yes, it takes time. A well-kneaded dough will feel smooth and slightly warm to the touch. If you rush this step, the gluten will not develop fully, and the roti will likely crack when you roll it.
Oil plays a supporting role here. Adding a teaspoon of oil or ghee during the kneading process lubricates the gluten strands. This makes the dough softer and prevents it from drying out while it rests. It also helps the roti puff up later because the oil creates a barrier that traps steam inside the layers.

The Importance of Resting Time
After kneading, you must let the dough sit. This is the step most people skip, and it is the main reason rotis turn out uneven. When you knead, you stretch the gluten tight. If you roll immediately, the dough fights back and shrinks. Resting allows the gluten to relax.
Cover the dough ball with a damp cloth or a bowl. Do not leave it exposed to air, or a skin will form on the surface. This skin restricts expansion when you try to roll it out. Let it rest for a minimum of 30 minutes. In a humid climate like Sydney, 20 minutes might suffice, but in dry conditions, extend it to 45 minutes.
During this time, the water fully hydrates the flour particles. The starch granules swell, and the gluten network loosens. When you punch the dough down after resting, it should feel softer than before. If it feels stiff, knead it for another minute and rest it again. A relaxed dough rolls out effortlessly into a circle without needing excessive force.
The Art of Rolling
Now comes the visual part. You have prepared the dough; now you shape it. Divide the rested dough into small, equal-sized balls. Use a scale if you want precision, or just pinch off equal portions. Roll each ball between your palms until it is smooth. Any cracks on the surface of the ball will show up as cracks in the roti.
Flour the surface lightly. Too much flour makes the roti dry and prevents it from sticking to the pan. Too little makes it stick to the board. Dust the ball lightly and press it flat with your palm.
Place the rolling pin on the center of the dough. Roll away from you, then rotate the dough 45 degrees. Roll again away from you. Rotate and repeat. Do not push the pin back and forth in one direction. This creates an oval shape. The rotation ensures the diameter remains consistent in all directions.
Keep the pressure even. If you press harder on one side, that side becomes thinner and cooks faster. Lift the roti occasionally to check the thickness. It should be translucent when held up to light. If you see thick spots, roll over them gently. If you see thin spots, avoid rolling over them to prevent tearing.
Cooking on the Tawa
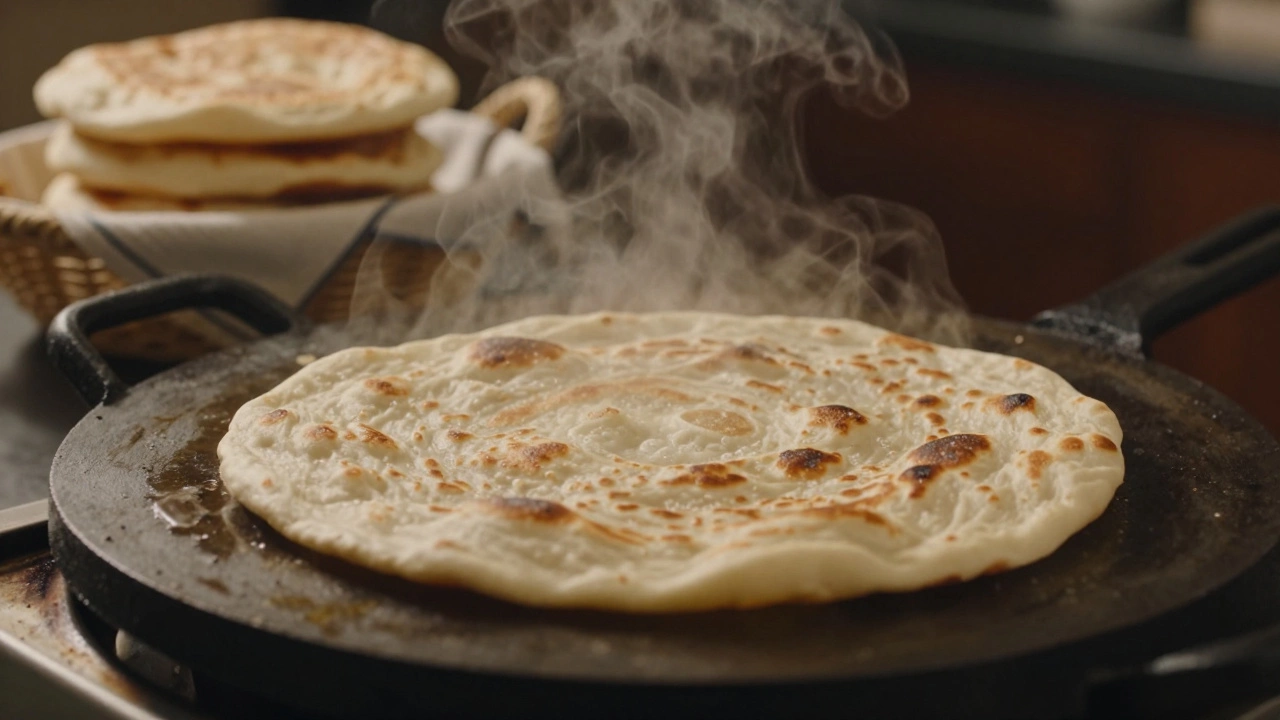
Once rolled, the cooking process determines the final shape and puff. You need a Tawa is a flat, circular griddle used for cooking Indian flatbreads. Griddle Pan typically made of cast iron or steel, it retains heat well for even cooking. Cast iron is preferred because it holds heat longer, but a heavy steel pan works too. Heat the pan on medium-high. If the pan is too cold, the roti will absorb oil and become hard. If it is too hot, it will burn before it cooks through.
Test the heat by sprinkling a few drops of water. They should sizzle and evaporate quickly. Place the rolled roti on the hot surface. Cook for about 30 seconds until you see small bubbles forming. Flip it over. Cook the other side for another 30 seconds. You should see brown spots appearing.
Flip it back to the first side. Now, press the edges gently with a clean cloth or spatula. This encourages the trapped steam to puff the bread. If it does not puff, it usually means the heat is too low or the dough is too dry. You can place it directly on an open flame for a few seconds to force the puff, but a hot pan is usually enough.
Once both sides have golden brown spots and the roti has puffed, remove it from the heat. Brush it with a little ghee or oil if you prefer, but it is not necessary for the texture. Stack the cooked rotis in a cloth-lined basket to keep them soft. The steam trapped inside the stack keeps them pliable for serving.
Troubleshooting Common Issues
Even with the right technique, things can go wrong. Here is how to fix the most common problems.
| Issue | Cause | Solution |
|---|---|---|
| Roti tears while rolling | Dough is too dry or not rested | Add water and knead; rest longer |
| Roti is hard or chewy | Too much flour or undercooked | Reduce flour; cook until fully puffed |
| Roti does not puff | Heat too low or dough too thick | Increase heat; roll thinner |
| Uneven shape | Rolling without rotating | Rotate dough 45 degrees after each roll |
If your roti shrinks back after you roll it, the gluten is still tight. You need to let it rest longer. If the roti burns on the outside but remains raw inside, your heat is too high. Lower the flame and cook slower. Consistency comes from observing these small details rather than following a rigid timer.
Another issue is the flour quality. If you are using store-bought whole wheat flour that is very coarse, try sifting it before making the dough. This removes large bran particles that interrupt the smooth surface. Some people mix a small amount of maida (refined flour) with atta to improve elasticity, but pure atta works if kneaded well.
Storage matters too. Fresh rotis are best, but you can store them in an airtight container for a few days. Reheat them on a dry pan to restore softness. Do not microwave them directly, as this makes them rubbery. A quick pass on the tawa revives the texture and brings back the aroma.
Frequently Asked Questions
Why does my roti shrink after rolling?
Shrinking happens because the gluten is too tight. You need to knead the dough longer and let it rest for at least 30 minutes before rolling. This relaxes the protein strands.
How much water do I need for 2 cups of flour?
Generally, you need about 1 cup of warm water for 2 cups of flour. Add it gradually until the dough reaches an earlobe-like consistency.
Can I make roti dough ahead of time?
Yes, you can store the dough in the refrigerator for up to 2 days. Bring it to room temperature before rolling to ensure it stays soft.
What is the best pan for cooking roti?
A cast iron tawa is best because it retains heat evenly. A heavy-bottomed non-stick pan also works well for beginners.
Why are my rotis hard after cooling?
Hard rotis usually mean the dough was too dry or the cooking time was too long. Brushing with ghee after cooking helps keep them soft.
Mastering the art of flatbread is a journey. It takes a few batches to find your rhythm with the rolling pin and the heat. Do not get discouraged if the first few are imperfect. Each attempt teaches you something about the texture and behavior of the dough. With practice, you will find that making a perfect circle becomes second nature.